What key ingredient did you leave out of the recipe this time?

When we were growing up we rarely ate out at restaurants. There were many reasons for this. We often lived in rural areas miles from towns and with no restaurants nearby; we weren’t terribly rich; but most important of all, my mother was an amazing and creative cook who could make any prepared foods we purchased, much better at home.

This was long before the days of the internet and recipes usually came out of women’s magazines. I don’t remember my mother clipping recipes and don’t think my mother had eaten at any non-Indian restaurant till her early middle-age. But she had this amazing capacity for presenting a beautiful and delicious version of any dish she had heard or read about. Sweet and sour pork. Pasta dishes. Donuts. Bread pudding. Trifle. You name it.

Living so far from big cities, we also didn’t have a lot of the ingredients that exotic dishes called for, but my mother had improvisation down to a fine art. She was endlessly creative in what she fed us and put on the dinner table. And I was amazed as I grew up and began to travel to realize how authentic her flavors were.

My sisters and I often ask my mother for recipes and we have a standing joke among us that she will always withhold a key ingredient so no one can make a dish as well as she can. But I realize the problem is not that she doesn’t tell us all the ingredients, but it’s that people who don’t use written recipes depend on their intuition, smell, sight and taste when cooking, as well as making adjustments as they go along.

I too, tend to be a creative cook, and love to experiment with new recipes. When I eat something new and interesting, I must try to recreate it. If I eat something, and don’t like it, I’ll try to find a way to make it better. And I also endlessly create new recipes.

Caramel Custard was one dessert my mother made very regularly, and alternated it with another version that is like a bread pudding. We had these desserts at least once a month as we were growing up, and for me are a big nostalgia inducer.

When I first moved to the US in the early 1980’s, I remember calling my mother and asking her for her bread pudding recipe. I didn’t really like the bread-y American version. Here is what she said. “One cup milk. One egg. One slice of bread. Sugar. And a pinch of salt.” Then she added, “If you don’t use bread, use 2 eggs, and adjust everything to taste.”

I went on to make Caramel Custard one of my favorite and signature dishes. I discovered also over the years that there is a Mexican version called “flan”.

One adjustment I made to my mother’s Bread Pudding/Caramel Custard recipe, was to make a version with orange juice instead of milk. I had been fascinated by the big jugs of real orange juice that were in every American grocery store, and would enthusiastically buy them, and look for ways to use them up.

This Orange Flan or Orange Caramel Custard is one my favorite inventions from almost 30 years ago. It is light and delicious, and I usually make individual flans so they are a small and refreshing dessert. This is also really easy to prepare as I never bother separating yolks or all those other steps that custards call for. Just mix it all up. 😊

So, as I say to my own daughter and son-in-law (and anyone else who uses one of my recipes), use my recipe, but “Adjust to taste.” **

Orange flan close up

Jayanti’s Orange Flan (Orange Caramel Custard)

Makes 6-8 small flans or one large flan.

For the Caramel
1/3 cup granulated white sugar
1 tsp unsalted butter

Place the sugar in a heavy bottomed pan over low heat, gently shaking the pan until the sugar is melted and turning light brown. Turn off the heat and divide the caramel into the 6-oz oven-safe bowls or a 6-cup baking dish.
Let it cool for 10 minutes. The caramel should harden. Gently butter the baking dishes. Don’t worry if the caramel cracks. Set aside.


Ingredients for the flan/custard
2 cups pulp-free, unsweetened orange juice
4 eggs
A pinch of salt
½ cup sugar (or adjust to taste)
I inch cube ginger grated and juice separated from the fiber through a tea strainer (or ½ tsp powdered cinnamon)
A pinch of cayenne pepper (optional)

Preheat the oven to 350°F.

Take a large oven-safe pan that is at least 1½ inches deep and that can accommodate the ramekins or the baking dish, and fill it with ½ inch of water. Set aside.

Beat the eggs well with the sugar.
Add the orange juice, pinch of salt, ginger juice (or cinnamon), and cayenne pepper (if used).
Blend well and divide between the prepared bowls/ramekins or baking dish.
Carefully place the flan dishes in the water and move into the pre-heated oven.

Bake for 25-30 minutes.
Check the flan after 25 minutes. Custard should shake a little but be set.
Take the flans out of the oven. Cool to room temperature  and then refrigerate covered for at least 3 hours.

Flans small

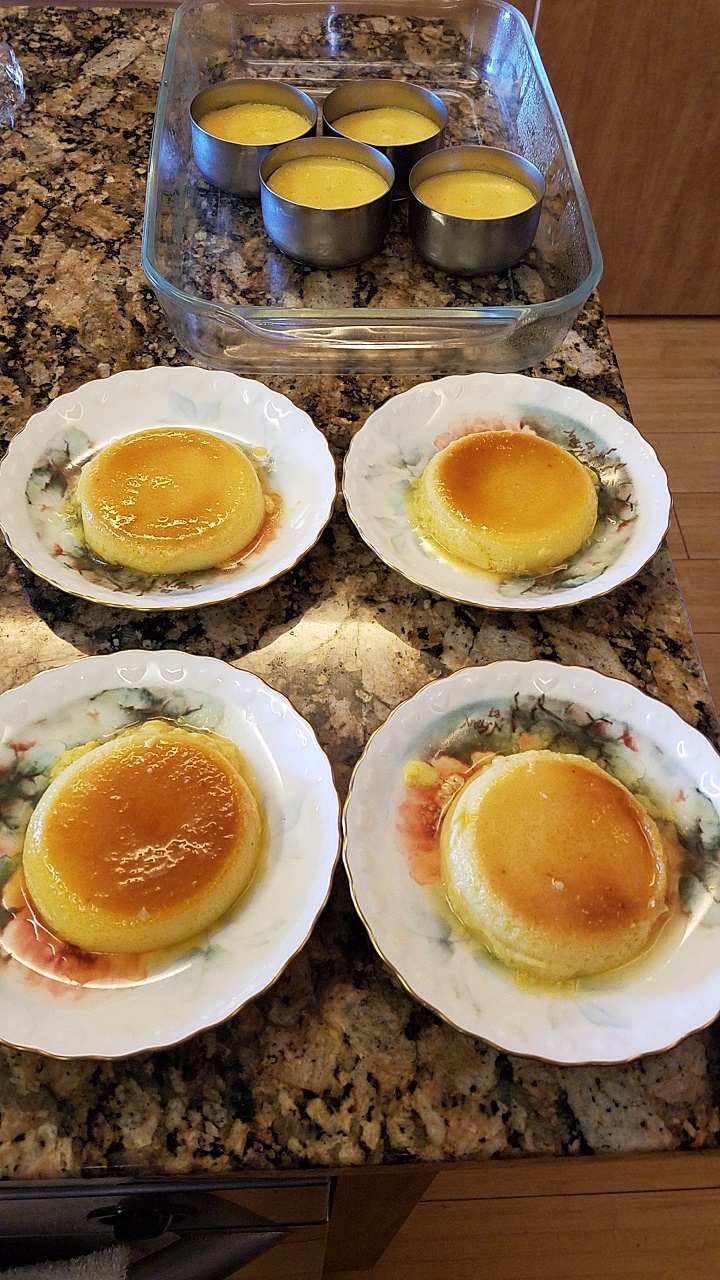
To unmold, run a sharp knife along the wall of the dish. Tap gently so the flan shakes loose, place a serving plate/bowl on top of the dish and invert quickly. The flan should slide out easily.

You don’t need to add any topping, but if you must, crème fraiche goes well with it.

Enjoy!

**Also, please credit me/my blog if you reference this recipe in your own work.


Repurposing those Ornamental Pumpkins into Pumpkin Bread Pudding

I have talked about this before, the difficulty I have throwing anything away. I have been gradually weaning myself away from my attachment to clothes I will never wear again, toys that my children loved (but I probably loved more) which will be completely obsolete when and if I ever have grandchildren, and books that are worn out and dog eared.

But food is a whole different matter.

I still find myself forcing that last piece of food down rather than scrapping it. I find it hard to appreciate a finely carved Jack-o-lantern. All I can think about is the fact that a big huge pumpkin will go uneaten! Carved pumpkins start rotting and growing fungus almost immediately, so putting them to any reuse beyond composting is not an option.

So this year I was very pleased with myself when I hit upon the idea of cooking with the ornamental miniature pumpkins I always buy around Halloween. This idea struck me when I ordered pumpkin bread pudding at a restaurant a few weeks ago. I dislike pie crusts, so eating pumpkin pie (or any pie) in public is usually an ordeal for me. I love the filling but have to agonize over wasting the crust and being seen as a boor and wasting food, or eating the crust and risking gagging in public and insulting the chef.

My mother used to make bread pudding very regularly when we were growing up and it has a very special place in my heart.The bread pudding at the restaurant that day was delicious, so making pumpkin bread pudding was my perfect Thanksgiving alternative. Plus, I had saved all these bread crusts I had cut off the bread when I served stuffed grilled sandwiches a few weeks back. I had planned to make them into breadcrumbs, but this was even better. 

Once I had decided that I was going to repurpose my ornamental pumpkins after Halloween, I consciously chose the larger ornamental pumpkins for my decorations.

pbp1

The smaller ones might work, but I suspect that it would be so much work getting any flesh out of them, that they are best consigned to the compost heap. The good news is that our compost heap has been giving us so many volunteer squashes and pumpkins that we have been well supplied with food from that pile all through this fall.

So here is a delicious pumpkin bread pudding I made with ornamental pumpkins and leftover bread crusts and heels.

pbp9


Pumpkin Bread Pudding

1 cup cooked mashed pumpkin (you can use the canned variety)
3 eggs lightly beaten
1 cup pure heavy cream
½ cup milk
½ cup sugar
A generous pinch of salt
½ tsp ginger
½ tsp Cardamom powder
½ tsp Cinnamon powder
¼ tsp ground cloves

5-6 cups cubed white bread crusts and heels, or cubed heavy bread like sour dough
¼ cup chopped dates (optional)
3 oz melted butter

Preheat the oven to 350°.

Gently mix the bread cubes (and dates if used) with the butter in a 9 or 10 inch rectangle oven proof dish and spread them out. Don’t press the cubes down too firmly. You want some pieces sticking up for a beautiful look and some crisp pieces for texture.

Blend the rest of the ingredients together well and pour over the bread making sure you get some of the mixture on the cubes, even those sticking up.

pbp7
Bake in the center of the oven for 35-40 minutes or till the top is golden and an inserted toothpick comes out clean.

Serve warm or at room temperature with unsweetened or very lightly sweetened whipped cream.

pbp8

Cooking your pumpkins.

Preheat the oven to 375°.

Cut the pumpkins in half and scrape out the seeds and any fibrous bits clinging to the inside.

pbp2      pbp3

Place the pumpkins cut side up in a pan with ½” of water. Cook for 10 minutes and then flip the pumpkins over. Cook for another 15 minutes or until the pumpkins begin to look translucent and cooked.

pbp4    pbp5

Take the pumpkins out and let them drain for about 5 minutes.

Scrape the flesh out of the pumpkin shells with a teaspoon.

pbp6

If you leave about 1/8-1/6” of pumpkin flesh in the shells you have beautiful bowls to serve a pumpkin soup in.  But you may need to use pruning shears to clip the pumpkin stems prior to cooking so they stay flat.

Enjoy the fine art of living the good life!

Sharing good times and recipes

Having common interests is not so much the basis of a successful relationship as having things you do and enjoy together. For my spouse and me, travel and food are among the things we enjoy sharing the most. We will pretty much go anywhere and try most any food – cooking it or eating it – as a couple. And though I know I can sometimes get a little competitive in my cooking (if my husband cooks something I usually cook and does better than I would!), cooking is one of the most relaxing activities for me.

I also always challenge myself to take common recipes and to make as healthy a version of them as I can by reducing fats and adding whole grains, vegetables, etc. Usually keeping my son’s Type 1 diabetes in mind.

So when I heard my sister Ranjana raving about my sister Nandini’s “Shrimp with Kaffir Lime Leaves”, I had to find out more. Nandini is an amazing cook, and cooks really fast too. She often cooks unusual and complicated Indian dishes that are completely beyond me. But this recipe sounded easy and quick, which, for me, is how cooking should be, if at all possible. Plus I adore the smell of kaffir lime leaves in food.

My husband and I were planning a quick trip to visit our son at the university where he is a PhD student. I always carry food when we visit our children, and listening to Nandini describing the recipe to me over the phone, it sounded as if we had all the necessary ingredients at home and I decided to try this recipe out. We also had all kinds of squashes and chili peppers growing in our garden. I love cooking Thai pumpkin curry so I decided to merge the recipe and our home grown vegetables.Needless to say, our son, who usually sees us arriving with cookies and other dry comestibles, was extremely pleased when I handed the container of fragrant food  to him.

butternut-squash

I am sure most Thai people would object to my calling this a Thai recipe, but I think the look and taste were close enough that I will call it

“Thai Style Pumpkin Curry with Shrimp”

Ingredients:

2 lbs shrimp cleaned, washed and drained
2 ½ – 3 cups peeled cubed pumpkin, butternut or acorn squash
¾ -1 cup red, yellow or orange bell pepper cut into ½” slices
½ cup sweet onion cut into ½” slices
3 cloves garlic finely grated
2 tsp salt divided or to taste
2-3 tsp brown sugar or to taste
½ -1 tsp red pepper
½ tsp turmeric powder
10-12 Kaffir lime leaves
2-3 thick chili peppers seeded and sliced lengthwise – jalapeño or serrano
1 can 14 oz coconut milk (unsweetened)
3 oz (1/2 small can) tomato paste
3 TBS canola oil or some other vegetable/peanut oil

Add the garlic, red pepper, turmeric and 1 tsp salt to the shrimp. Mix well and set aside.

Mix the coconut milk and tomato paste well together. Set aside

Bring 1 cup of water to boil in a sauce pan. Add the pumpkin and 3-4 TBS of the coconut-tomato paste. Stir well and bring back to a boil. Cover and cook on medium heat for about 5 minutes till the pumpkin is barely cooked but not soft. Set aside.

Heat the oil on high heat in a large flat bottomed nonstick pan.
Add the shrimp and sauté on high till the shrimp turns opaque and starts getting golden along the edges.
Add the onion and bell pepper and continue to stir and sauté for about 2 minutes.
Reduce heat to medium.
Add the coconut milk-tomato mixture, the chili pepper slices, and the pumpkin in its sauce to the pan.
Add the sugar (if used) and the remaining alt and stir well. Bring back to a boil.
Cover and cook on medium heat for another 5-6 minutes or till the vegetables are cooked but not soggy. Stir occasionally and make sure it is not sticking to the bottom or burning.  Add a little water if necessary.
Add the kaffir lime leaves, stir and take off from the heat. Cover and let sit for about 5 minutes before serving.

pumpkin-curry-with-shrimp


Delicious!

When life hands you plums, you make fruit leather

Week 25
132 lbs

I often wonder how I survived my childhood. We had a lot of fun roaming around the neighborhood with our friends unsupervised, but that wasn’t the problem. The problem was that we ate any and every thing that looked like it was round and juicy and grew on a tree. And that we could reach.

I don’t remember anyone ever telling us that it was okay to eat the shiny blue-purple berries from the lantana bushes, but we picked them and ate them with impunity. (I later learned that the unripe lantana berries can be very poisonous and can even be fatal.) We routinely and blithely also ate the beautiful red banyan berries with their strange hollowed out seedy insides.

Sometimes we would pick random flat green beans and eat because no one else was harvesting them as food. That they weren’t being harvested should have been a clue, but no one said we were thinking. The Pride of Barbados shrubs were a favorite. We would painstakingly split open the pods and take out the smooth perfectly shaped seeds. Next we would peel the aril off and eat the flat, sweet centers. Beause it took so much work and took so long to get to the centers, we probably didn’t eat very much and hence were able to remain standing. I now am wise to the fact that the seeds of the Caesalpinia pulcherrim, that’s the botanical name for Pride of Barbados, are always poisonous once they reach maturity.

We did eat a lot of good fruit too. There were many varieties of mangoes (but these were better protected and harder to find lying around), guavas ( the sweetest and best ones were those that the parrots had started eating), and tamarind by the hundreds (which a neighbor couldn’t use but got really upset if she caught us eating them). But none of these were as exciting as those undiscovered fruit that we thought we were discovering while exploring the neighborhood.

Through great good fortune, reach my maturity I did. But I have never lost the habit of being unable to walk by a new fruit or vegetable without trying it.These days it is in the grocery store and hence usually the results are okay. Except for that first time I saw persimmons.

I was new to this country and excited about trying everything “American” – anything I had not seen before. These fruits were shiny, smooth and a bright color – everything that drew my magpie brain*.

“What a beautiful name,” I thought as I rolled the word persimmon around in my mouth, and as I rolled the fruits around in my hand. I gently pressed them and pushed the soft, mushy ones aside. I was mildly shocked that American grocers would put rotting fruit out, but then attributed it to a sloppy worker. I lovingly rubbed my fingers against the silky outsides of the fruit. I sniffed them – no unpleasant odors. I carefully selected two, took them home and placed them in the fridge to chill.

Two anxious hours later I took one out and cut the firm smooth flesh into even slices, setting the beautiful black seeds on their own plate to be admired, and possibly planted, later. I sat down at the dining table and carefully bit into a piece.

Halelujah! That was the fastest I had ever moved from the table to the sink. I spent the rest of the day trying to scrape my tongue clean. I genuinely thought I had poisoned myself and couldn’t get rid of the other persimmon fast enough. Our poor downstairs neighbor managed to duck just in time as a bright orange missile went whizzing past head. Even now, he may believe that he saw a true UFO that day.

The corollary to all this is that I can say, with all honesty and with no undue bragging, that I became an excellent cook. My fearless berry eating made me into a bold, creative chef, who is very good at blending flavors and smells. Of course, as an Indian, I think the ability to blend flavors is in my genes.

People, including my children, are constantly asking me for my recipes, but I rarely write them down. So I decided that as part of my good life project, I need to start writing down my recipes and saving them for my children, for myself, and to share with friends. I was also inspired by my niece who has an amazing food blog called Quinces and Lemons. She has actually published some of my recipes, and I admit, I often go to her blog to check how I made a specific item.

Fruit leather:
Good for adults. Loved by children.

This is a great way to use over-ripe fruit. I used the plums from my sister’s tree which was heavy with fruit this year. In fact I only used the plums that had fallen on the ground, most of which were smashed or misshapen.

This recipe is for plums, but you can use a variety of fruit, or even a blend of fruit. You will need to adjust the initial cooking time depending on how firm the fruit is.
Ingredients

4-5 pints ripe plums (8-10 cups of fruit)
1 cup sugar or to taste

Pre-heat the oven to 400˚F

Wash and pat dry the plums.
Seed and halve/quarter the plums and spread them out on a baking tray skin side down.
(Sorry, I forgot to take a picture of the plums before they were cooked.)

Bake for 20 minutes.
IMG_20150624_112446135

Let the fruit cool and blend in a food processor with the sugar. A very smooth puree will result in a very professional looking end product, but I sometimes like to keep a few little bits of skin for texture and an interesting appearance. IMG_20150624_112504992

If you are making the leather in the oven, line the trays with parchment paper.IMG_20150624_115404310_HDR
(Tip: See how I use clothes pins to hold the parchment paper in place. Just remember to take the pins off before you put them in the oven!)

Spread the puree in the trays to a thickness/depth of about 1/6 to 1/8 of an inch and place in the oven or dehydrator at 140˚F.

IMG_20150624_120159209

IMG_20150624_123315885

If you are using the oven, make sure you leave the door  propped slightly open  (a wooden spoon works really well).
IMG_20150624_123332545

After 8 hours test for doneness. The leather should be set and should not stick to your fingers, but should still give a little when you press down. If not done, let it continue to dry and check every hour to reach a good fruit leather consistency that is not too dry and tough. (Of course, kids love the chewy stuff and it is a good way to slow down consumption of the fruit leather.)

IMG_20150625_180425968

IMG_20150625_180551498_HDR
Take out the leather and slice into the desired width with a sharp knife. You may need to rub the knife with a mild vegetable oil like canola oil. If the leather is sticky, you can use a brush to rub a couple of drops of oil over the surface.

IMG_20150625_180716618

Let the leather cool completely and then roll the strips or store them flat.

IMG_20150625_180833612

IMG_20150625_181457118_HDR

If your fruit leather is less dry, I recommend storing it in the refrigerator. When in doubt – just refrigerate. However, these are so delicious, they’ll probably disappear before you need to refrigerate them.

~~~~~~~~~~~~~~~~

Notes:
* Yes. I know. Magpies don’t actually like shiny objects.